How to Build a Website Change Detector (Node.js Guide + When to Buy)
Building a website change detector is one of those projects that looks like an afternoon task and turns into a week of edge cases. The core loop is genuinely simple: fetch a page, extract a value, compare it to the last value, fire a notification if it changed. You can have something working in under 100 lines of Node.js.
The problems surface later — JavaScript-rendered pages that return blank HTML to a plain fetch, anti-bot blocks that kick in after a few dozen requests, duplicate alerts from transient network errors, and the quiet burden of keeping dozens of monitors running reliably. This guide walks through both sides honestly: how to build a website change detection script that works, and where the DIY approach starts costing more than it saves.
The core loop: what a website change detector actually does
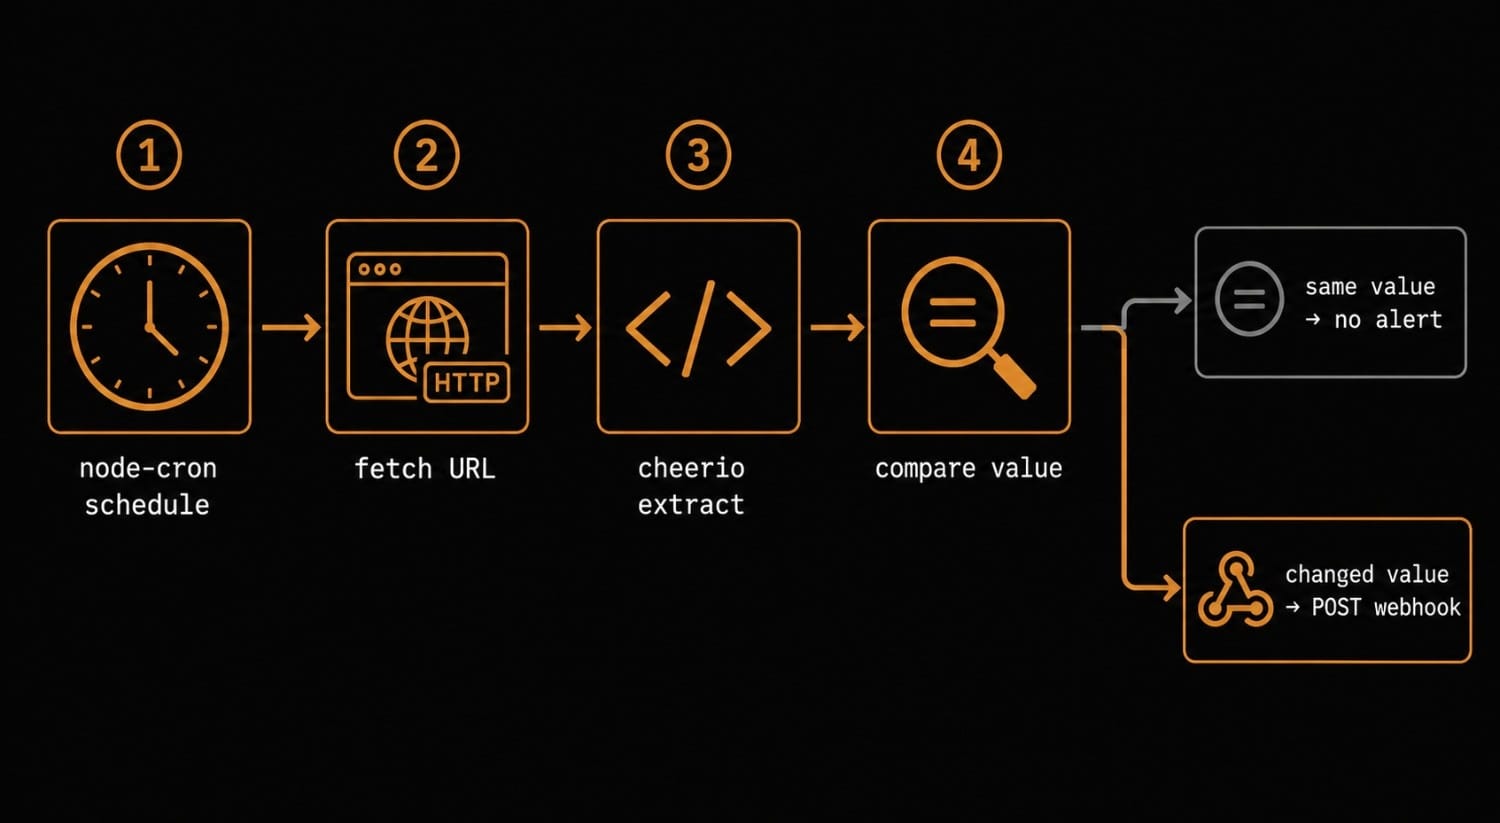
Every website change detector, simple or complex, runs the same pipeline:
- Fetch the target URL on a schedule
- Extract the specific value you care about (a price, a version number, a status string)
- Diff the extracted value against the last stored value
- Deliver a notification if the diff is non-empty and passes your filter
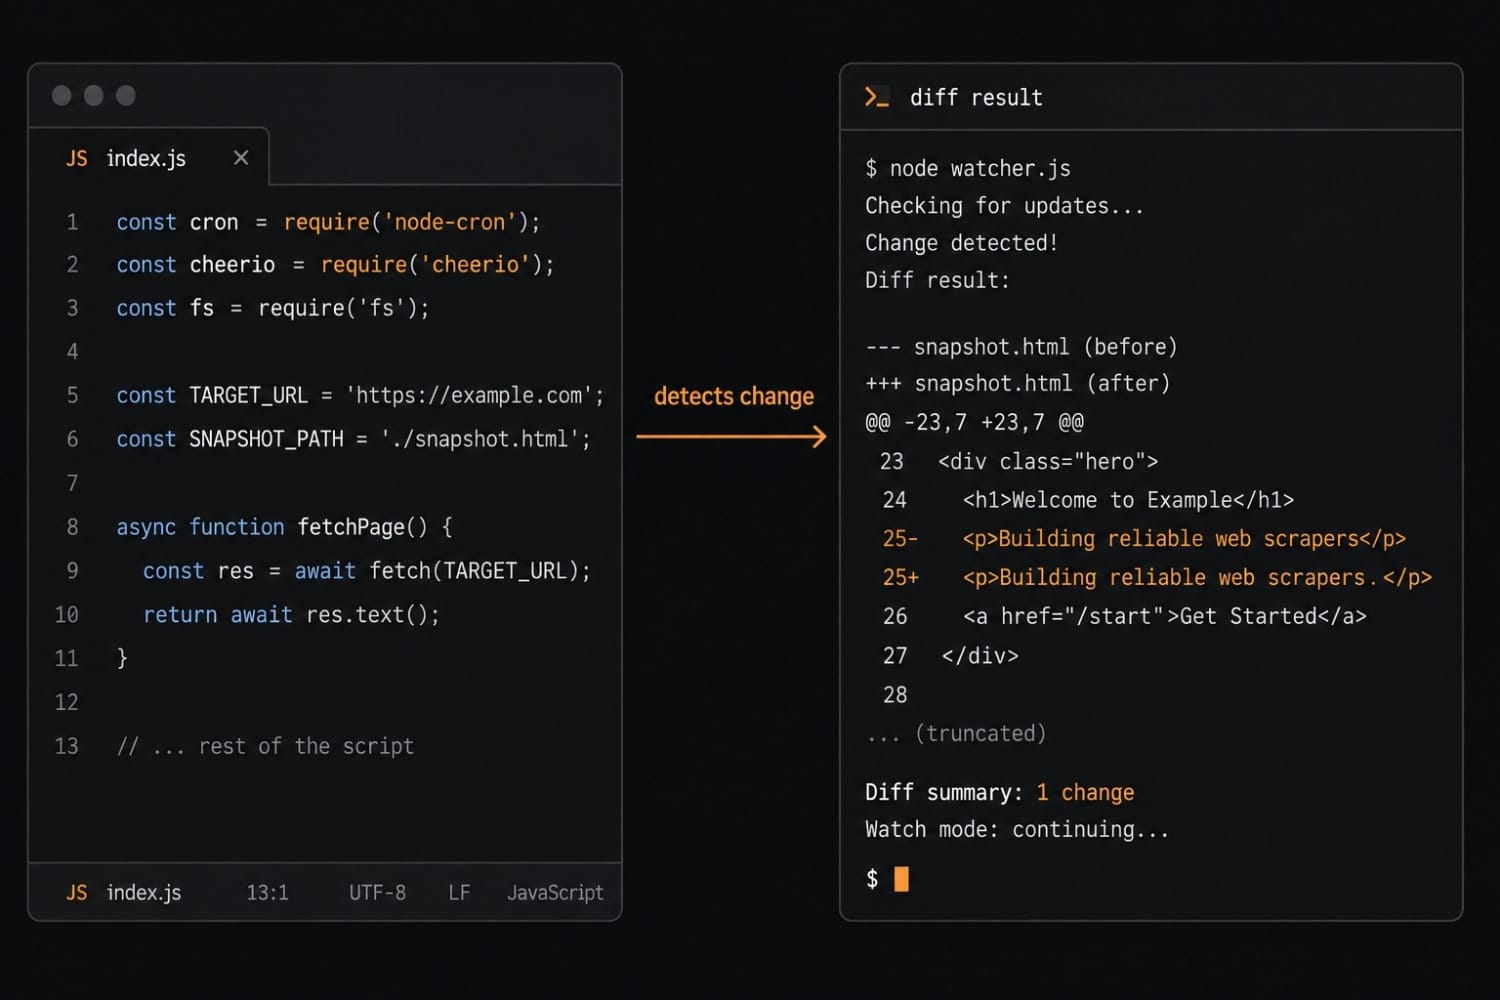
The "extract" and "diff" steps are where most of the interesting decisions happen. You can diff the full raw HTML, which is noisy. Or you can target a specific CSS selector, XPath, or JSON path and diff only that — which gives you signal instead of noise. Verid's change detection overview explains how this pipeline works in a production context.
For now, let's build the minimal version in Node.js.
Building the minimal Node.js implementation
Prerequisites
You need Node.js 18+ and three packages:
npm install node-cron cheerio node-fetchnode-cron— runs the detector on a schedulecheerio— parses HTML and lets you query with CSS selectorsnode-fetch— plain HTTP requests (built into Node 18+ asfetch, but explicit import is cleaner)
Step 1: Fetch and extract
Start with a function that fetches a URL and extracts the text content of a CSS selector:
// detector.js
import * as cheerio from 'cheerio';
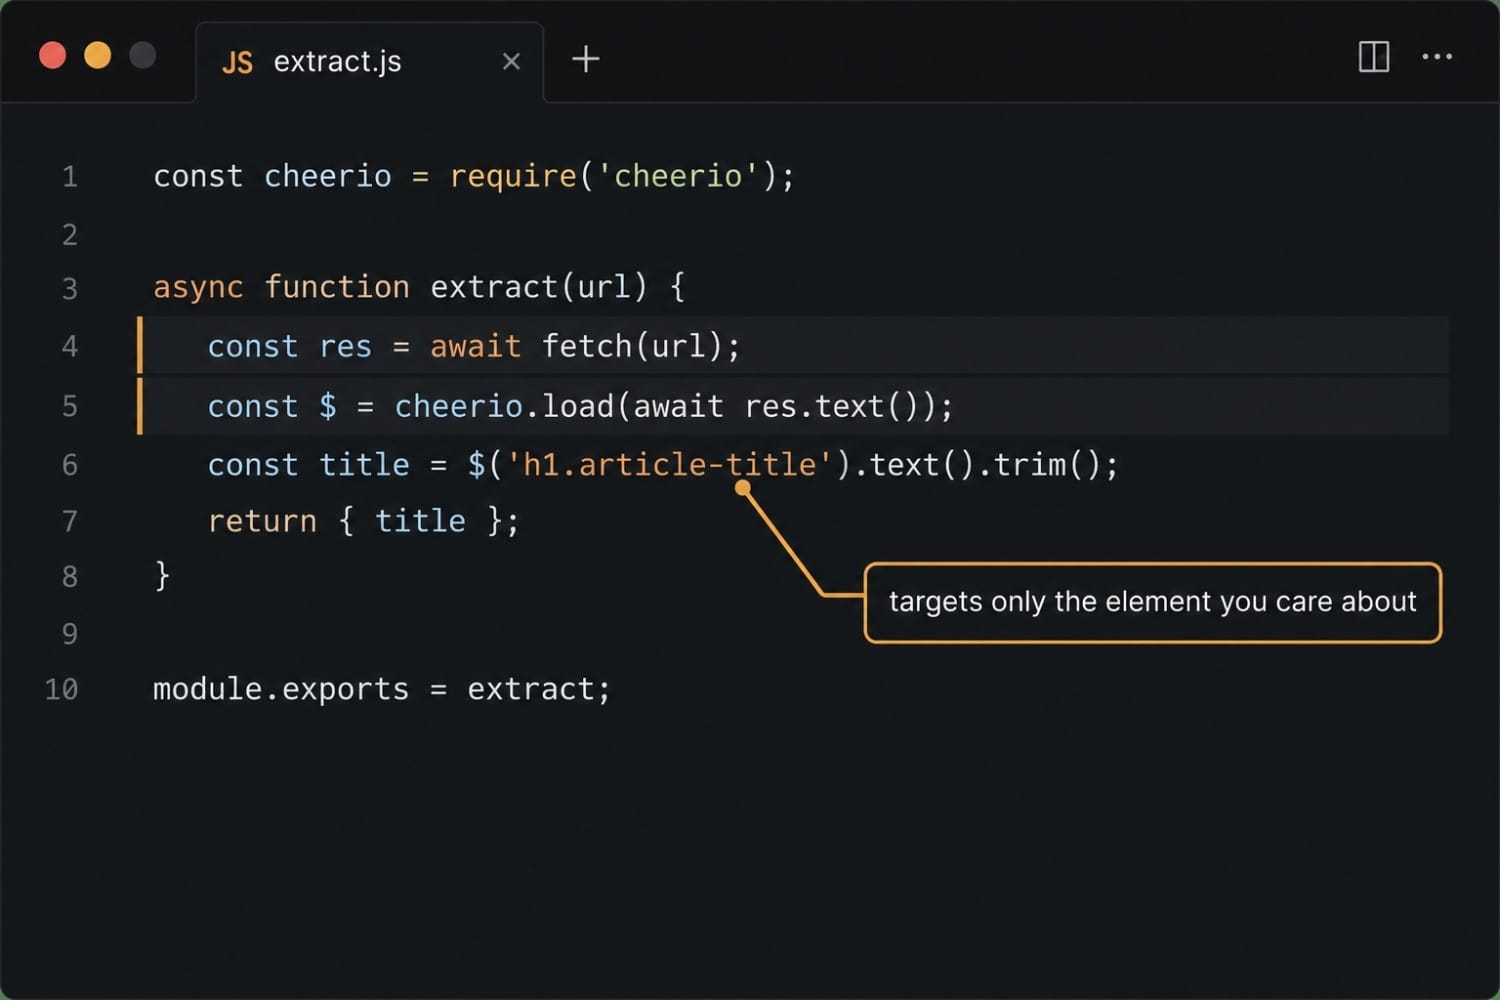
async function extract(url, selector) {
const response = await fetch(url, {
headers: {
'User-Agent': 'Mozilla/5.0 (compatible; ChangeDetector/1.0)',
},
});
if (!response.ok) {
throw new Error(`Fetch failed: ${response.status} ${url}`);
}
const html = await response.text();
const $ = cheerio.load(html);
return $(selector).first().text().trim();
}The User-Agent header matters. Many servers return a different response or block entirely when they see Node's default node-fetch/... string. Using a browser-like UA avoids a category of false negatives before you even get to the interesting problems.
To learn how CSS selectors work for targeting specific page elements, see the CSS selector extraction guide.
Step 2: Persist the last value and diff
You need to store the previous value somewhere so you can compare. For a toy detector, a local JSON file works fine:
import { readFileSync, writeFileSync, existsSync } from 'fs';

const STATE_FILE = './state.json';

function loadState() {
  if (!existsSync(STATE_FILE)) return {};
  return JSON.parse(readFileSync(STATE_FILE, 'utf8'));
}

function saveState(state) {
  writeFileSync(STATE_FILE, JSON.stringify(state, null, 2));
}

function hasChanged(key, newValue, state) {
  if (!(key in state)) return false; // first run — no baseline yet
  return state[key] !== newValue;
}
The hasChanged check returns false on the first run intentionally. You don't want to fire an alert just because you've never seen the page before — you want to fire when the value changes between two successive checks.
Step 3: Deliver the notification
For the notification, POST the change to a webhook. This keeps the detector decoupled from any particular alert channel — the webhook receiver handles routing to Slack, email, PagerDuty, or wherever:
async function notify(url, oldValue, newValue) {
  const payload = {
    url,
    changed_at: new Date().toISOString(),
    old_value: oldValue,
    new_value: newValue,
  };

  const res = await fetch(process.env.WEBHOOK_URL, {
    method: 'POST',
    headers: { 'Content-Type': 'application/json' },
    body: JSON.stringify(payload),
  });

  if (!res.ok) {
    console.error(`Webhook delivery failed: ${res.status}`);
  }
}
Step 4: Wire it together with node-cron
import cron from 'node-cron';

const MONITORS = [
  {
    key: 'example-price',
    url: 'https://example.com/product/widget',
    selector: '.price',
  },
];

cron.schedule('0 * * * *', async () => {
  const state = loadState();

  for (const monitor of MONITORS) {
    try {
      const value = await extract(monitor.url, monitor.selector);

      if (hasChanged(monitor.key, value, state)) {
        await notify(monitor.url, state[monitor.key], value);
      }

      state[monitor.key] = value;
    } catch (err) {
      console.error(`Check failed for ${monitor.url}:`, err.message);
    }
  }

  saveState(state);
});
The cron expression 0 * * * * runs once per hour at the top of the hour. The try/catch ensures one failed check doesn't abort the entire batch. This is a working website change detection script — it fetches, extracts with a CSS selector, diffs, and POSTs on change.
For JSON API targets (a REST endpoint that returns structured data), swap cheerio for a JSONPath library and target a specific field path. The JSONPath extraction guide covers the selector syntax. For cases where you want to detect any change on a page without targeting a specific element, a full-page hash is more appropriate — hash the entire response body and compare. See the full-page hash guide.
Where the DIY approach breaks down
The script above handles the happy path. Here is where it stops being enough.
JavaScript-rendered pages
The fetch call above sends an HTTP GET and parses whatever the server returns. For static or server-rendered pages, that's fine. But a large share of modern pages — React SPAs, Next.js apps, Shopify storefronts, any page that populates content after the initial load — return a near-empty HTML shell to a plain HTTP request. The data you want is loaded by JavaScript after the page mounts.
To detect changes on these pages, you need a real browser: launch Chromium, wait for the network to settle, then query the DOM. Playwright is the right tool:
import { chromium } from 'playwright';
async function extractWithBrowser(url, selector) {
const browser = await chromium.launch();
const page = await browser.newPage();
await page.goto(url, { waitUntil: 'networkidle' });
const value = await page.textContent(selector);
await browser.close();
return value?.trim() ?? '';
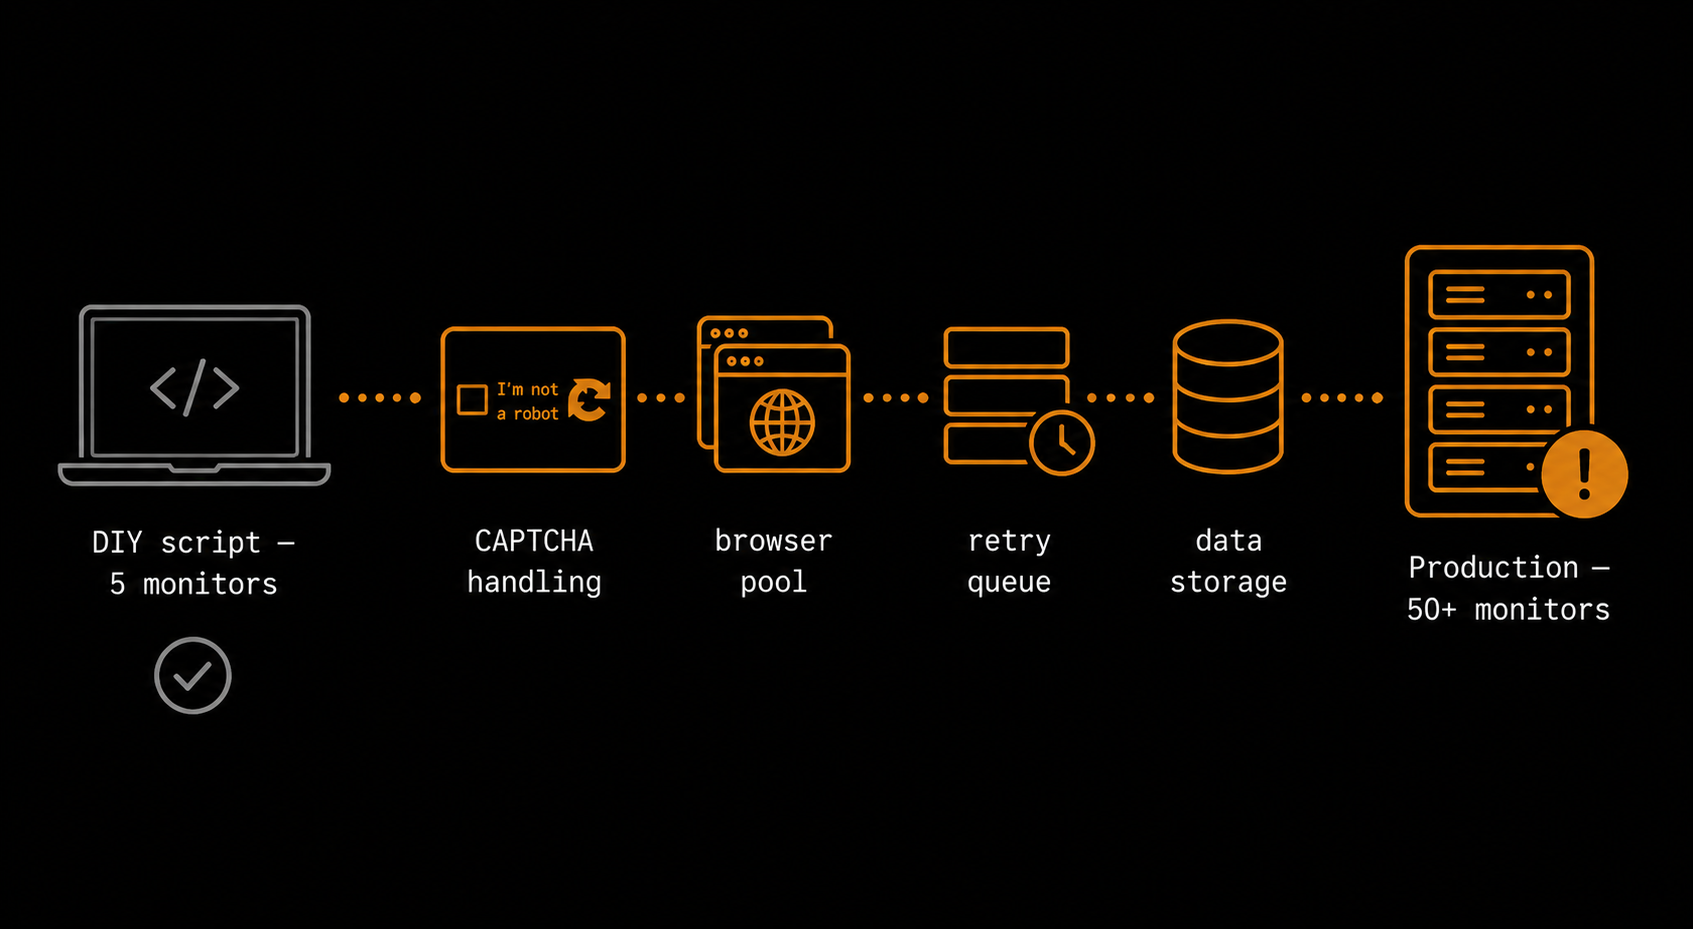
}This works, but it adds three to four seconds of latency per check, consumes significant memory, and means you're spinning up a Chromium instance for every monitor on every tick. At five monitors it's fine. At fifty, you're managing a browser pool.
Anti-bot blocking and residential proxies
Once your monitors run frequently enough — or once you're hitting the same domain from the same IP — you'll encounter bot detection. CAPTCHAs, IP bans, and fingerprinting are all real. Some sites use behavioral analysis (mouse movement patterns, timing of requests) that a plain browser automation script fails.
The standard mitigation is residential proxies: route requests through real residential IP addresses that rotate between checks. This is an infrastructure investment on top of an already-growing codebase.
Retry logic and idempotency
Networks fail. A 503 during a check should not silently reset your stored baseline. Your script needs to distinguish between "I couldn't fetch the page" (retry) and "I fetched the page and the value changed" (alert). The code above logs the error and moves on, but it also skips the saveState call for that key — which means the next successful check will see a diff against the value from before the failed run. Whether that's the behavior you want depends on your use case, but it's worth thinking through deliberately.
Deduplication and alert fatigue
Some pages change transiently — an ad slot loads a different creative, a "last updated" timestamp refreshes, a countdown timer ticks. If you're diffing raw HTML instead of a scoped selector, you'll get a flood of noise. Even with a scoped selector, some values flicker: a price that changes for a few minutes and then reverts.
Managing this requires predicates: "fire only if the value has been different for two consecutive checks" or "fire only if the numeric value has changed by more than 5%." Building predicate logic into a custom detector is doable but adds conditional complexity that compounds as you add monitors.
Scaling to many monitors
If you're running this as production infrastructure for 50+ URLs, the stateless JSON file approach breaks. You need a database to store per-monitor state, a job queue to avoid running all checks concurrently at the top of the hour, a dead-letter queue for failed deliveries, and some kind of delivery log so you can audit what fired and when.
That's a small internal platform, not a script. Verid's features overview documents how these pieces work in a production-grade system: BullMQ job queue, 6-retry delivery with exponential backoff, dead-letter queue, and a structured delivery log for every alert.
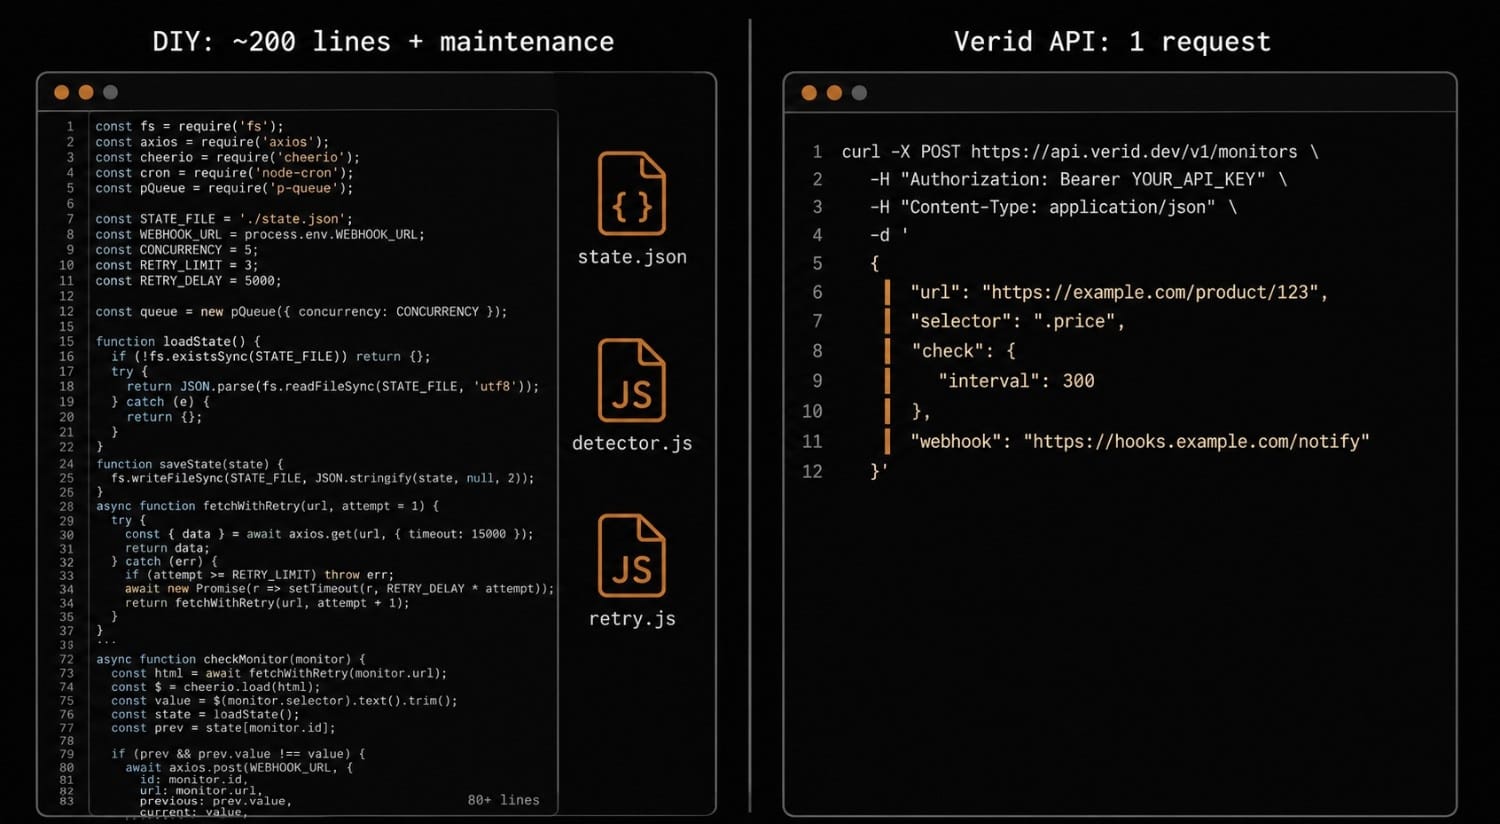
The equivalent in a single API call
Once you've decided the page you want to monitor is worth watching in production, the build path becomes: maintain a cron runner, a Playwright browser pool, a retry queue, a state database, and a delivery log. Or POST one request to Verid's REST API and let the infrastructure run elsewhere.
This is what the same monitor looks like as a Verid API call:
curl -X POST https://api.verid.dev/v1/monitors \
  -H "Authorization: Bearer vrd_your_api_key" \
  -H "Content-Type: application/json" \
  -d '{
    "url": "https://example.com/product/widget",
    "name": "Widget price monitor",
    "interval": 3600,
    "extract": {
      "method": "css",
      "selector": ".price"
    },
    "predicates": [
      { "type": "field_changes" }
    ],
    "notifications": [
      {
        "type": "webhook",
        "url": "https://your-server.example.com/hooks/verid"
      }
    ]
  }'
Verid handles the fetch (escalating automatically from static → headless browser → residential proxy if the page needs it), the extract, the diff, the predicate check, and the signed webhook delivery. The Verid-Signature HMAC-SHA256 header on every payload means you can verify authenticity without building your own signing layer.
If you want to fire only on a specific condition — say, only when a numeric price field decreases by more than 10% — you add a predicate:
"predicates": [
  { "type": "field_decreases_by_percent", "threshold": 10 }
]
Predicates can be composed with AND/OR logic, so you can express conditions like "fire only when the status field changes AND the value matches a specific regex." See the notifications documentation for the full predicate reference.
For a full walkthrough of creating your first monitor via the API, the quickstart guide covers authentication, creating a monitor, and verifying your first webhook delivery. If you prefer the Node.js SDK over raw HTTP, the API features page links to the official package.
Build vs. buy: an honest assessment
Building your own website change detection script makes sense in specific circumstances:
- You're watching one or two pages and have no uptime requirements
- You're building it as a learning exercise (it's a genuinely good project for understanding HTTP, HTML parsing, and job scheduling)
- The page you're targeting has unusual extraction requirements that no off-the-shelf tool supports
The case for a managed solution grows as soon as any of these apply:
- You need JS-rendered pages to work reliably
- You're monitoring more than ten URLs
- You need guaranteed delivery (retries, dead-letter queues, delivery logs)
- The check needs to run on a sub-hourly interval
- You want predicate-based filtering to suppress noise before it reaches your team
The honest version is: the script is not hard to write. The infrastructure to run it reliably is. When the infrastructure cost exceeds the cost of the service, it's worth switching.
Frequently Asked Questions
How do I detect changes on a JavaScript-rendered website?
A plain HTTP fetch returns the server-sent HTML before any JavaScript executes. To detect changes on a JS-rendered page, you need a real browser — launch Chromium with Playwright, navigate to the URL, wait for networkidle, then query the DOM. The tradeoff is memory and latency: each headless browser check takes 3–5 seconds and consumes significant RAM. Managed services like Verid handle this automatically as part of the fetch pipeline.
What is the best way to extract a specific value for change detection?
CSS selectors work for most HTML pages — target the element by class, ID, or attribute and read its text content. For JSON APIs, use JSONPath to target a specific field (e.g., $.data.price). For plain text pages or when you have no reliable selector, a full-page hash detects any change in the raw content. See CSS selector and JSONPath guides for syntax reference.
How do I avoid false alerts from transient page changes?
The most reliable approach is predicate-based filtering: only fire an alert when the value crosses a meaningful threshold, not on every diff. For example, "fire only when the price decreases by more than 5%" or "fire only when the status field matches the regex out.of.stock". Without predicates, minor page fluctuations — rotating ads, updated timestamps, A/B test variants — will generate noise.
How do I run a website change detection script on a schedule?
node-cron is the standard library for Node.js cron jobs. The expression 0 * * * * runs once per hour, */15 * * * * runs every 15 minutes. For production workloads, consider a proper job queue (BullMQ, Agenda) rather than a single-process cron — you get retries, concurrency control, and visibility into job state.
How do I verify that a webhook came from my change detector and not a third party?
Sign the payload with HMAC-SHA256 using a shared secret, and include the signature in a header. On the receiving end, recompute the HMAC and compare. Verid does this automatically — every webhook includes a Verid-Signature header with the HMAC-SHA256 of the request body. The quickstart guide includes a verification example.
What should I store as the "previous state" for change detection?
Store the extracted value, not the full HTML snapshot. A full HTML snapshot is large and diffs noisily. Store the specific string, number, or hash you extracted, keyed by monitor ID. For a JSON file approach this is straightforward; for production, use a database with a unique index on (monitor_id, check_timestamp) to avoid race conditions.
When should I build a custom detector vs. using a managed service?
Build it when you have one or two pages, no uptime requirements, and want to understand how the pipeline works. Move to a managed service like Verid when you need reliable JS-page support, sub-hourly checks, delivery guarantees, or you're running more monitors than you want to maintain.
Start monitoring without the plumbing
If you want the detection without the infrastructure, Verid has a permanent free plan — 5 monitors, daily checks, no credit card required. Setup takes under 5 minutes: create an account, POST your first monitor config, and your webhook starts receiving signed change payloads. See all plans on the pricing page if you need faster check intervals or a larger monitor count.
Related posts
How to Monitor GitHub Releases and Get Instant Slack or Discord Alerts
If you maintain or depend on open-source projects, you've almost certainly been burned by a release you missed. A breaking change ships in a framework you depend on, your CI starts failing on Monday morning, and you find out the fix landed three days ago. The problem isn't that the release happened quietly: it's that you had no reliable way to catch it. This guide covers how to monitor any GitHub repository for new releases and route a structured alert to Slack or Discord the moment a stable ve
Read the post →developer toolsPredicate-Based Alerting: Stop Getting Spammed by Your Monitoring Tool
Alert fatigue is a monitoring tool bug. Verid's predicate system fires only when a change meets a condition — price drop, regex match, or threshold crossed.
Read the post →competitor monitoringMonitor Competitor Pricing Pages with Webhooks (Step-by-Step)
Set up a webhook receiver that fires on real price changes: verified payload, currency parsing, noise filtering, and routing to Slack or a repricing engine.
Read the post →website monitoringHow to Monitor Website Changes (And Get Notified Automatically)
Five ways to monitor a website for changes and get notified instantly — from free tools to developer-grade signed webhooks. Compared for 2026.
Read the post →